Jewelry storage doesn’t need to be simply functional, it can also be aesthetically pleasing while still serving the purpose of keeping sentimental items organized and easily accessible. While space-saving is a top priority for many, it’s possible to accomplish this while still adding a decorative touch to your home. Here are some straightforward and practical ideas that could be of use.
Dreamcatcher Earring Caddy
This particular suggestion for storing jewelry is centered around a Dreamcatcher. The necessary items consist of an embroidery hoop, embroidery floss, and spray paint. To begin, divide the embroidery hoop into two sections and attach one end of the floss to the top of the hoop.
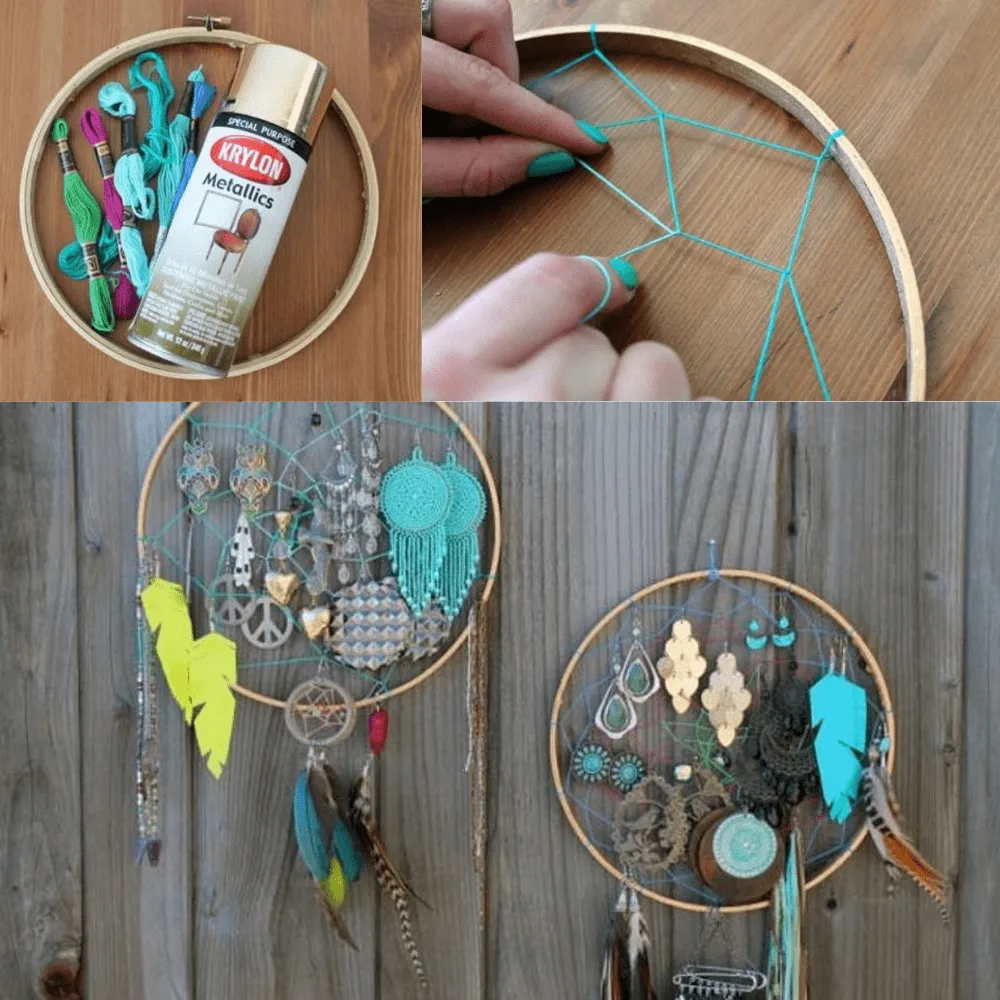
To begin, start at the initial knot and pull the floss three inches to the right before wrapping it around the hoop. Repeat this process until a seven-sided shape is created. Next, using the same floss, repeat the previous step at the midpoint of each side of the heptagon. Wrap a loop around the middle and tug it towards the next point. Your work is now finished!
Aluminum Paper Roll
Why leave your fancy jewelry in scattered or small containers when you can use a great alternative? The solution lies in a DIY aluminum paper roll. All you need is a used aluminum foil roll (with the round paper roll), dowels, glue, a wooden plaque, fine fabric, and your crafting skills.

Cover the paper roll with the fabric by applying glue to secure it. Proceed to drill a hole on the plaque and attach the dowel using wood glue. Afterward, make a circular hole on the paper roll and connect it onto the dowel. You are now done and it is ready to be used!
Wooden Earring and Ring Storage
This handmade earring and ring holder has a polished appearance that could be easily confused with a professionally-manufactured one. The necessary materials include dowels, a wooden box, fabric, gift wrap paper, and of course, glue. The first step is to obtain an open box similar to the one featured in the initial picture clockwise.
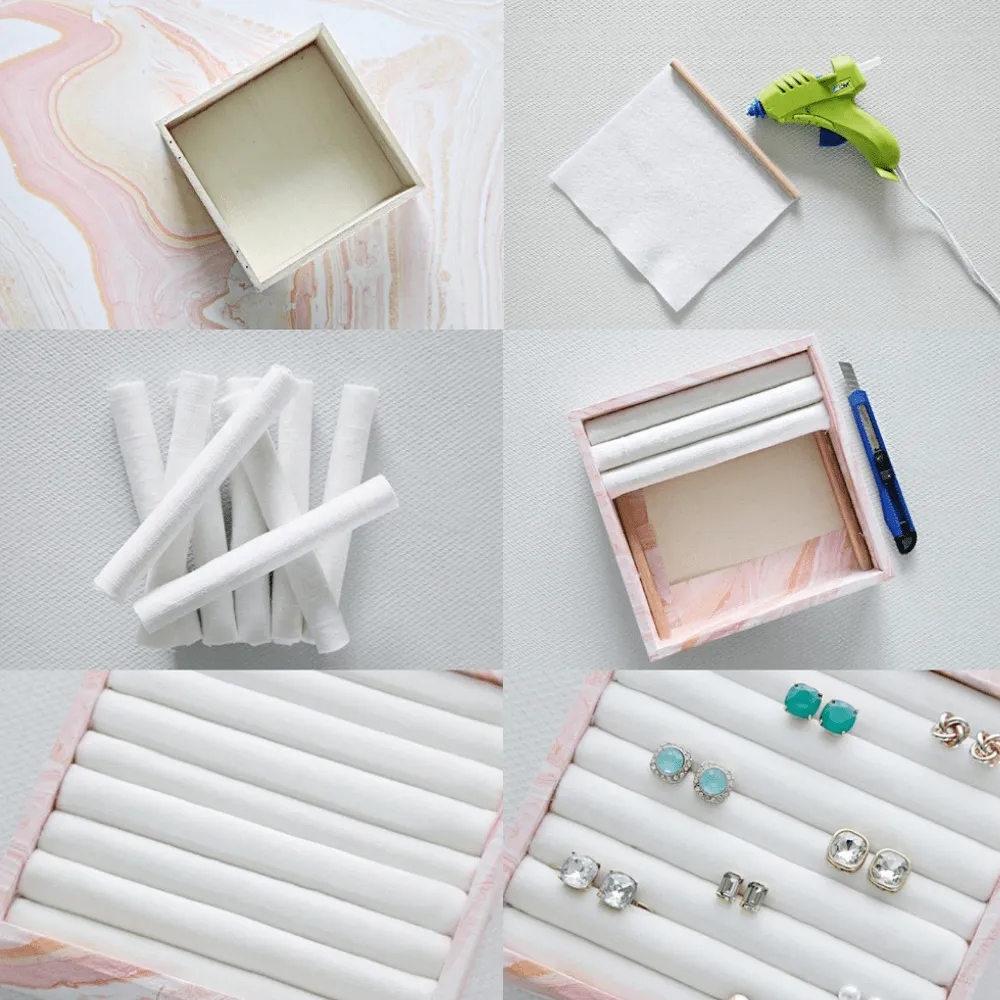
Cover the box with gift wrapping paper by using glue. Afterwards, cut a piece of fabric into the appropriate length and insert a dowel on each end. Roll the fabric to create a circular shape. To keep the rolled fabric in place at the edge of the box, attach a few dowels on each side and then attach the fabric to them using glue.
Driftwood and Watercolor Storage
The design is both imaginative and charming. An inexpensive method for storing jewelry that doesn’t involve hiding it away in a closet or secret storage space. All you need is a small board, miniature sticks, adhesive, and watercolors.

Observe the dimensions of the slender wooden sticks in the image, acquire comparable ones, and generate miniature perforations in the board with a screwdriver or drill. Proceed to coat the sticks with whichever hue you desire. Once the paint has dried, carefully insert the painted sticks into the holes and utilize adhesive to secure them in place. That’s it!
The Pebble Storage
Making a cost-effective and uncomplicated pebble storage unit is effortless. By using double-sided tape and gathering an assortment of pebbles, you can craft a magnificent wall design and jewelry storage solution. Simply locate some pebbles and acquire double-sided tape to begin.

Firstly, make sure that the pebbles are free from any dirt or debris. In case you’d like to add some extra decoration, feel free to apply paint to the pebbles according to your liking. After that, select one side of each pebble and attach a piece of tape to it. Once the tape is in place, mount the pebbles on the wall, allowing the double-sided tape to stick the pebble to the wall. Voila! Your beautiful yet uncomplicated design is now complete and ready for use.
Simple Dresser Jewelry Storage
If you have a love for DIY projects, you can complete this attractive design within a day. You’ll require materials such as wooden frame, aluminum sheet, glue, tin snips, and paint & brush. Your initial step is to paint the frame’s edges.

Afterwards, utilize tin snips to trim the aluminum sheet to match the frame design with two layers being appropriate. Attempt to position the sheets within the frame to verify whether they need to be adjusted. Then, use adhesive along the edges of the sheets and attach them to the frame.
Inspiring Wooden Storage
This beautiful and graceful jewelry storage option is a delight to look at. It is a cleverly designed wall-mounted piece crafted from wood. The jewelry hanger is skillfully made and can serve multiple purposes. It is a unique artwork with compartments at the top specifically designed for inserting small earrings.

Just a bit lower, there are hangers available for hanging necklaces and bracelets. If someone doesn’t have the expertise in woodworking, buying such a useful and artistic piece can only be done through online searching. Additionally, it can function as a room decoration, perfect for sprucing up a drab wall.
Scrapwood Jewelry Storage
The scrap wood storage is a DIY design that is customized to fit a dressing table accurately as it is too large to be hung. The materials required are wooden pieces, a board, circular rods, stapler guns, doll pin stands, adhesive, and cup hooks.

First, create holes in the woods that are the right size to fit the dowels. After that, apply paint to the woods. Then, connect the hooks and dowels to the holes that have been drilled and use glue to ensure they are firmly in place. The dowels and hooks should also be painted. The storage is now ready for use.
Colorful and Patterned Aluminum Jewelry Storage
To create this DIY storage, you will need a frame and sheets of aluminum. The frame you choose will depend on the desired size. After selecting the frame, you can paint it and attach a board. To make it look attractive, cover the board with a beautiful wallpaper.

In order to create an attractive design, it is recommended that you remove the center portion of the wallpaper to form the shape of an aluminum sheet. Once this is done, you can place the aluminum sheet underneath and then carefully position the cut wallpaper on top. This will create a functional jewelry storage unit that is now ready for use. All you have to do now is attach your necklaces and earrings to it.
Magnetic Tray
Although not widely used, a magnetic tray is an inexpensive and uncomplicated option for storing jewelry, particularly for individuals who do not prefer to hang items on the walls. The magnetic tray can be placed on a dressing table, and because of its magnetic feature, the metal necklaces, earrings, and rings can be securely kept within it.
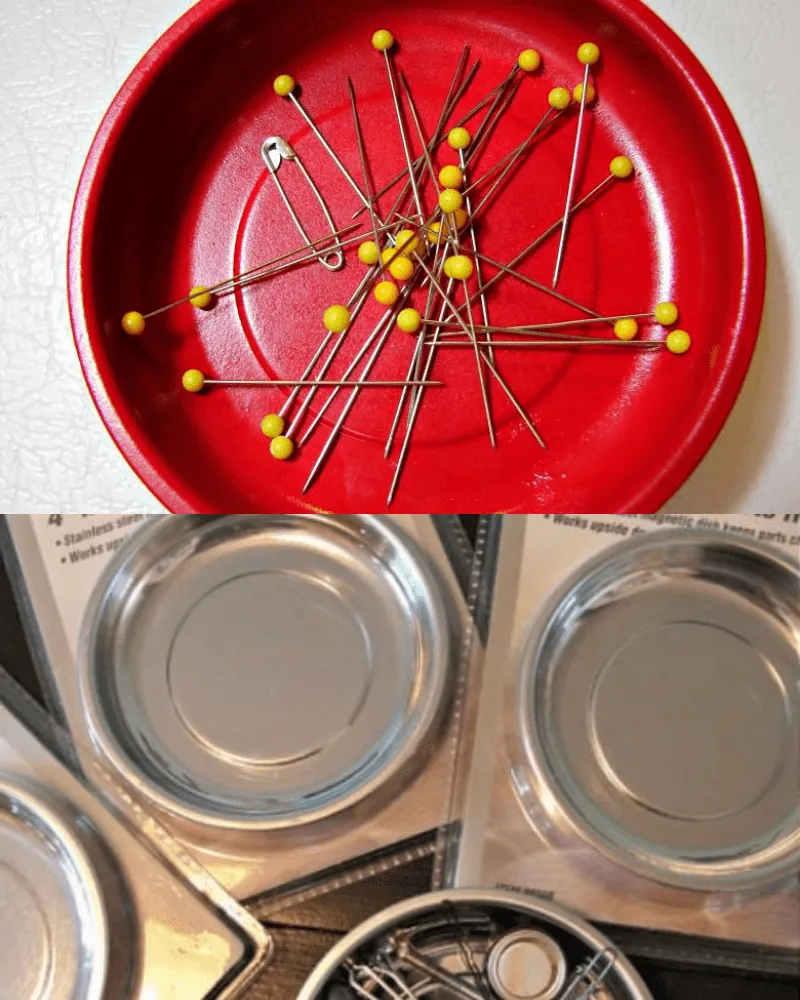
The tray’s magnetic properties ensure the safety of the jewelry pieces, even in the event of a drop. Additionally, the tray has the added benefit of being able to stick to any metal objects in the room.
Wood and Pegs
The wood and peg design is a low-cost, uncomplicated structure crafted using affordable components. The required materials include pegs, glue, a small wooden board, and paint. You can paint the board in any hue of your preference that aligns with the room’s theme.

Once the paint has fully dried, make sure that the pegs attached to the board are a different color so that the design can showcase well and appear striking. It is also important to evenly space the pegs, and a measuring tape could aid in accomplishing this. Following the measurements taken, securely attach the colored pegs to the board using glue. Finally, the project is complete!
Brass Stand Vintage Storage
This vintage jewelry storage idea is both inexpensive and attractive, with a simple, classy and chic design. If you already have an antique plate, it can reduce the cost. The required items for creating this storage are three antique plates, glue, and a brass stand. The process of making it is straightforward.

To start, put a plate on a table and apply glue to the middle. Next, place a brass stand on top and wait for it to dry. Then, put glue on the opposite end of the brass stand and attach another plate. Repeat this process by adding glue to each subsequent plate and attaching a brass stand to create a similar product to the first.
Chicken Wire Window Frame
If you have trouble with keeping your earrings organized, here’s an enjoyable yet effective solution! You can create your own chic jewelry storage with some basic items which include chicken wire window frame, chalky finish paint, jute cord, lace ribbon, foam brush, craft scissors, and sawtooth picture hangers.
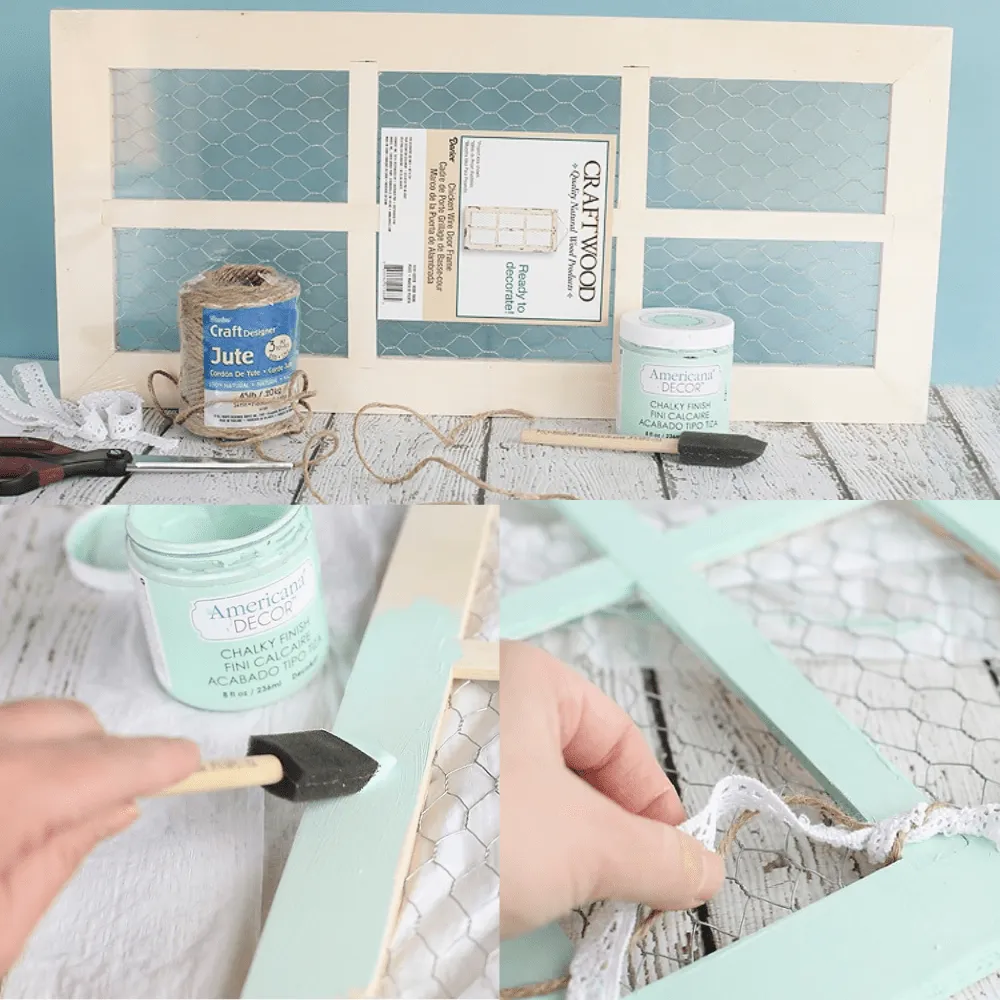
Using a small sponge brush, apply paint on the wooden frame. Next, prepare the same length of jute and lace ribbon and tie them into a bow on the top. Attach a sawtooth picture hanger at the back, and your DIY storage is now good to go!
Jenga Set Necklace Rack
To prepare the organizer, you will require several materials such as Jenga, painter’s tape, paint, a foam brush, glue, and wax paper. Begin by laying the wax paper on the work surface as a protective layer to prevent any damage to the workspace as you apply the glue and paint.

After that, utilize the painter’s tape to cover the parts of the Jenga block that do not need painting. Put a slim coating of glue onto one block and connect it to the next, guaranteeing that you glue all connecting sides. Once it has dried, it is now suitable for use. You may either glue it to the wall or hang it on the wall using a nail.
Wooden Necklace Holder
I have a brilliant suggestion for you to experiment with, which involves creating a basic storage unit using only a board and a handful of knobs. Take the board and create holes in it that match the size of the knobs.
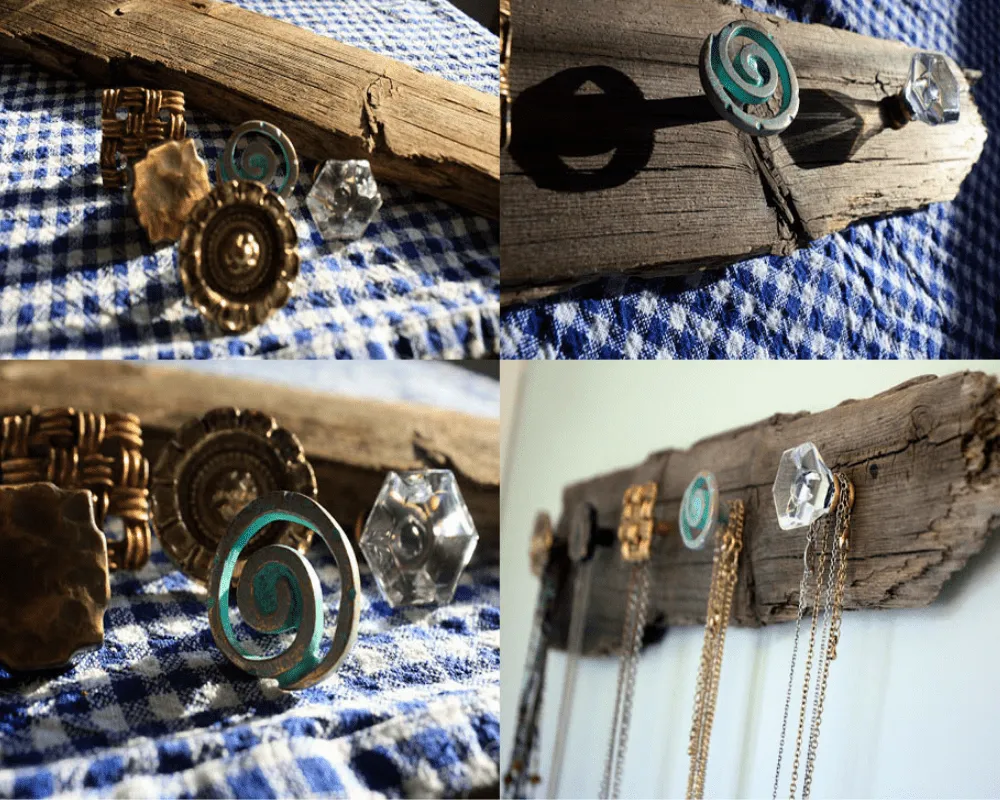
Afterward, fasten the knobs onto the flat board by utilizing the drill holes, and you’re done! It’s an uncomplicated and effortless process, isn’t it? It can be situated in any spot in a room, even on a wall, making it an excellent solution for storing jewelry.
Jewelry Holder Hanger
Are you searching for a jewelry storage solution that’s timeless and refined? Look no further than this effortless DIY option. It only requires a wooden hanger, hooks, and spray paint. Despite its simplicity, the end result is stunningly beautiful. Plus, the process itself is uncomplicated!
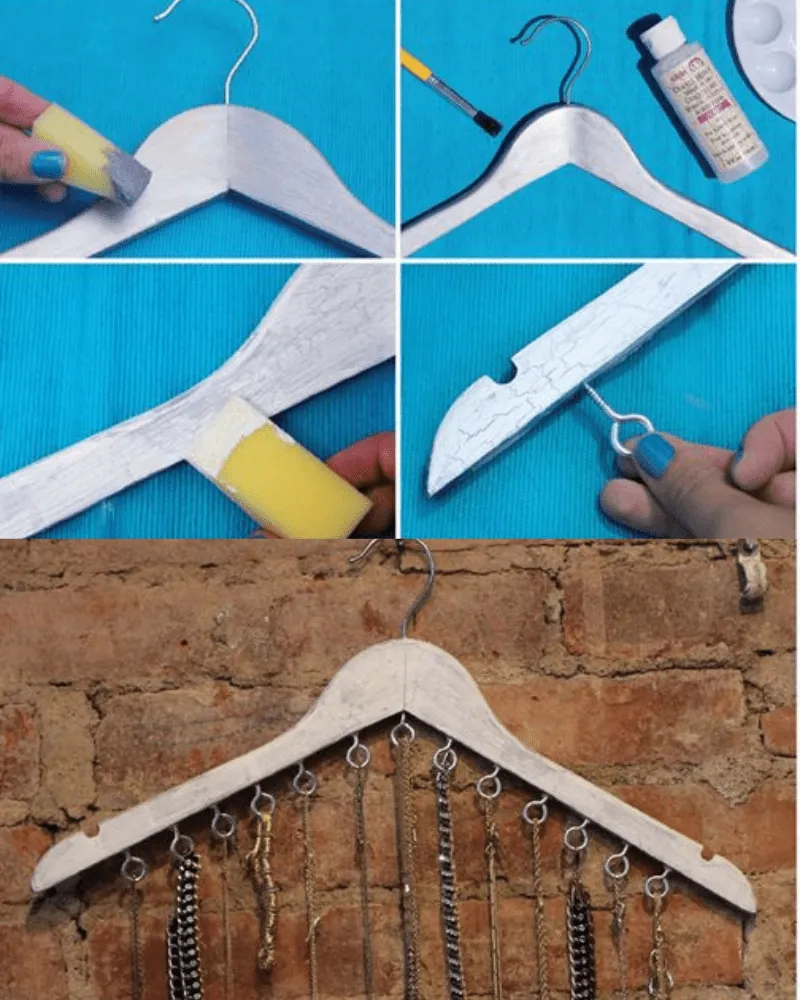
Firstly, put the wooden hanger onto a covered surface to avoid any marks. Then, using the spray paint, coat the wooden hanger and let it dry. Finally, fasten the hooks to the hanger and it’s now prepared to be utilized.
Notebook Jewelry Organizer
Are you always on the move and love to accessorize? Then this compact jewelry organizer is perfect for you! All you need are clear pouches, cord, patterned and solid fabric, sewing pins, and canvas. Start by cutting two 10×13 inch rectangles from the canvas to create the base.

Next, take another piece of canvas and patterned fabric, each measuring 11 x 15 inches, and cut them into rectangular shapes. Pin the center of the canvas onto the pouch and stitch it in place. Proceed to sew the solid fabrics onto the canvas to form pockets and loops for the jewelry to hang from. Once these steps are done, the pouch is now ready to be used.
Bottle Holder for Bracelets
I have another jewelry storage suggestion that is both easy and functional. You only require glass bottles that are medium in size and not excessively wide. To begin, put the bottle on a dresser or a bedroom shelf.

Then, place the larger and elastic bracelets at the bottom of the bottle while the smaller ones get the areas close to the neck of the bottle. This is super effective and easy to use. A glance is just enough of any piece of jewelry for the occasion from the storage.
Wall Hanging Jewelry Organizer
Simple yet gorgeous! That’s the perfect description of this idea. This can be achieved by transforming an old desk drawer, a wooden box, or a wooden tray into a beautiful organizer. Get a shallow wood box, paint, and any beautiful fabric, cup hooks, and glue.
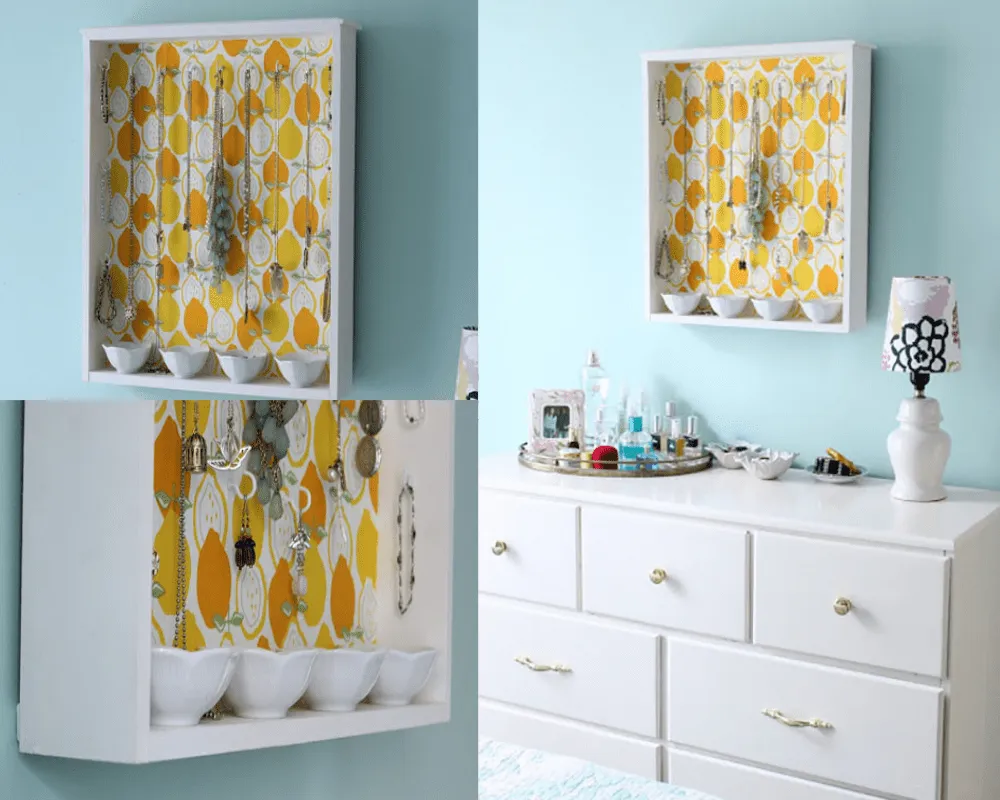
Paint the box, then glue the fabric to the inner part of the wooden tray. Drill well-spaced out holes in the inner part of the wooden tray and screw in some cup hooks—and it’s ready for use.
Driftwood Jewelry Organizer
This jewelry storage idea is super easy and an inexpensive solution to organization issues. The items needed for this project are; large pieces of driftwood, three packs of 1/2 inch brass cup hooks, and four 2-inch screws.
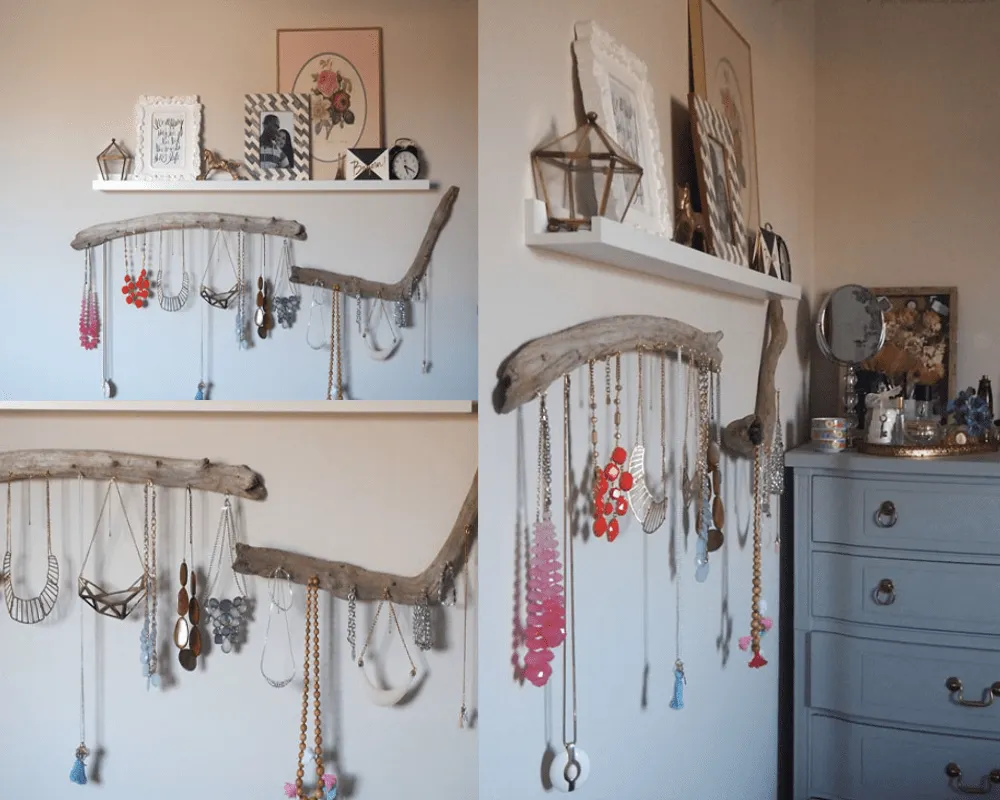
Put the cup hooks into the driftwood by simply applying pressure on the cup hook against the wood. Make sure to space the cup hooks out evenly – about 3 inches in between each hook will do. Look for studs in the wall and use screws to attach the finished project to the well.
Cigar Box Ring and Earring Organizer
This vintage organizer idea requires two basic items; an old cigar box and a quilt batting. First, measure the interior of the cigar box, then using scissors, cut out a strip of quilt batting about 0.5 inches wider than the size of the cigar box.

Next, roll up the quilt batting up like a cigar, and stitch it shut. Before repeating the process, try it out in the cigar box to see if it fits – if it does, great! Repeat the process till the cigar box is stuffed. And this DIY jewelry is done, ready for use!
Geometric Trinket Boxes
Elegant, gorgeous, and handy is the perfect description for this storage idea. For this, cabinet knobs, acrylic paint, and painter’s tape are the materials needed. Drill on a hole in the center of the box lid and attach the cabinet knobs using screws.
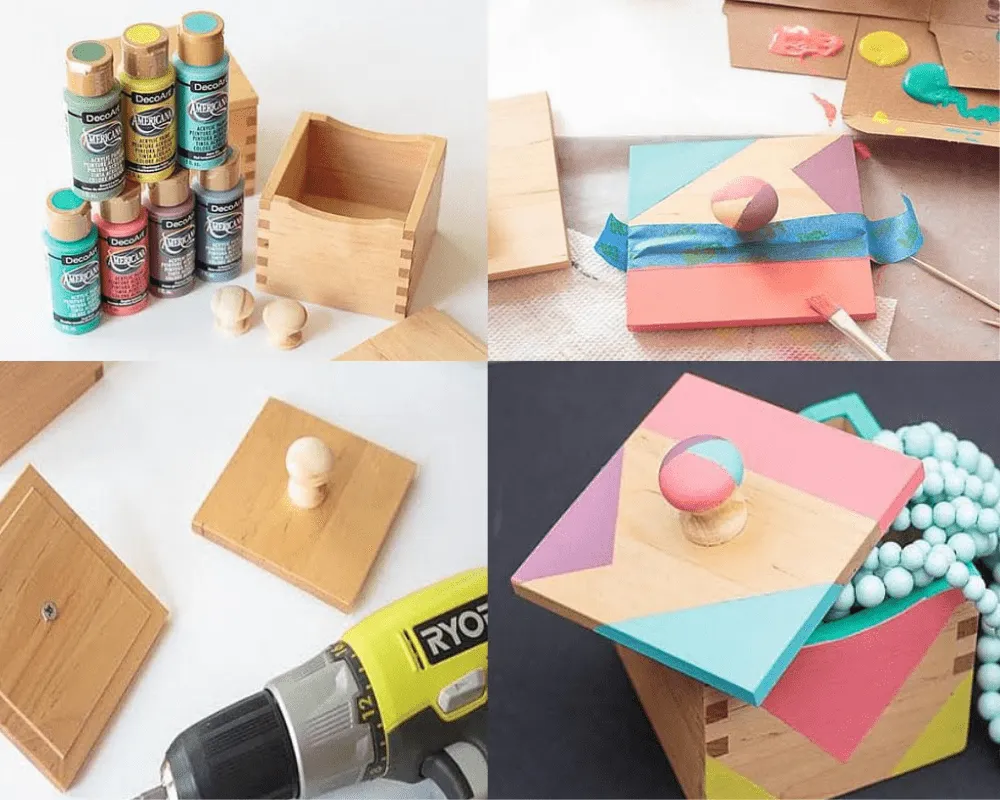
Next, use the painter’s tape to mask off geometry shapes on the box, paint with any color of choice, and yes! It’s ready for use.
DIY Jewelry Display Cones
Here’s another crafty idea to organize and display jewelry in your home or upcoming art and crafts show. Materials needed for this project include; heavyweight card stock, glue, scissors, and mod podge.

Cut out a preferred size from card stock, and roll the card stock into a cone shape, glue the card stock together. Seal the cones with a mod podge to make them last longer. Simply use this by placing larger pieces of jewelry at the bottom and the smaller ones around the top.
DIY Book Jewelry Box
This is as cheap simple as DIY jewelry storage can get, very classic and handy too! Items needed for this project are; an old book, Exacto knife, Mod Podge, Small Paint Brush, and Pencil. Sketch a rectangle on the first page, make sure to leave a border about 2 inches wide all around the book.
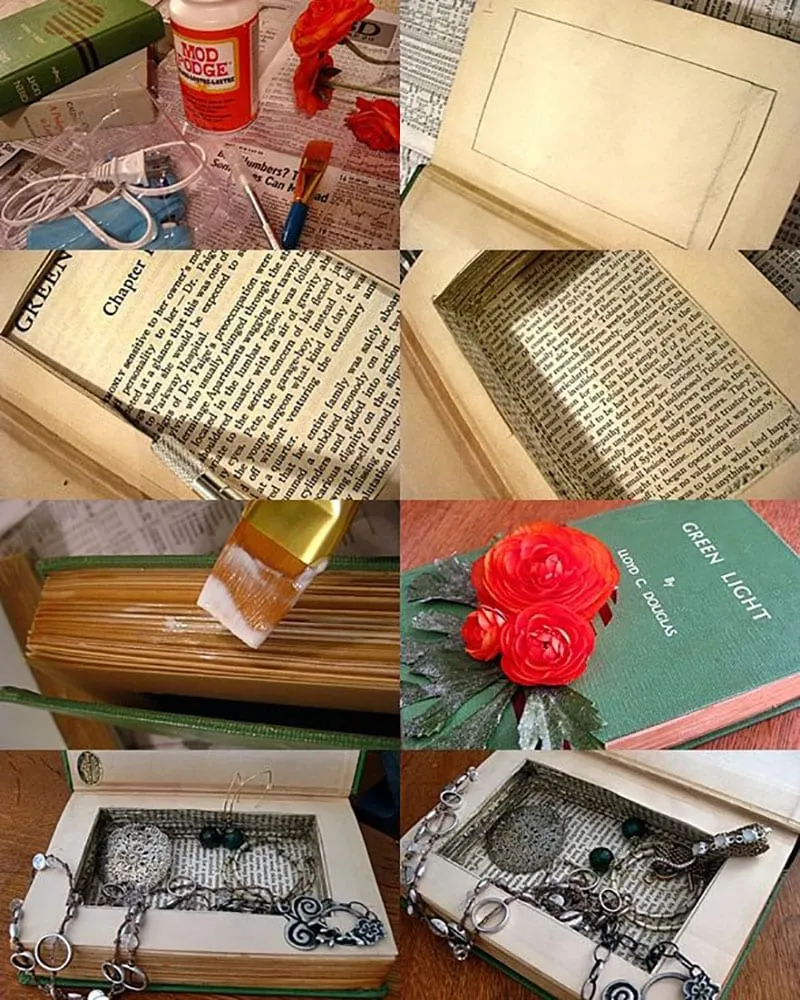
Then, with the Exacto knife, cut a rectangle using the lines drawn. This process would need to be repeated multiple times depending on the thickness of the book. Next, start Mod Podging every few pages together.
Plywood and Wallpaper Storage
It is not the simplest DIY jewelry storage but the result is lovely and easy to use. Plywood and wallpaper are the first things needed. Preferably, get plywood of 3/8 inches and a dimension of 22×22. Then, wrap the plywood with the wallpaper.

Next, use a pencil and tape to measure spots where holes will be created. Then use a screwdriver(or drill) to create small holes on the marked points. Lastly, get cabinet hardware and fix them on the drilled holes—ready for use!
DIY Wooden Jewelry Box
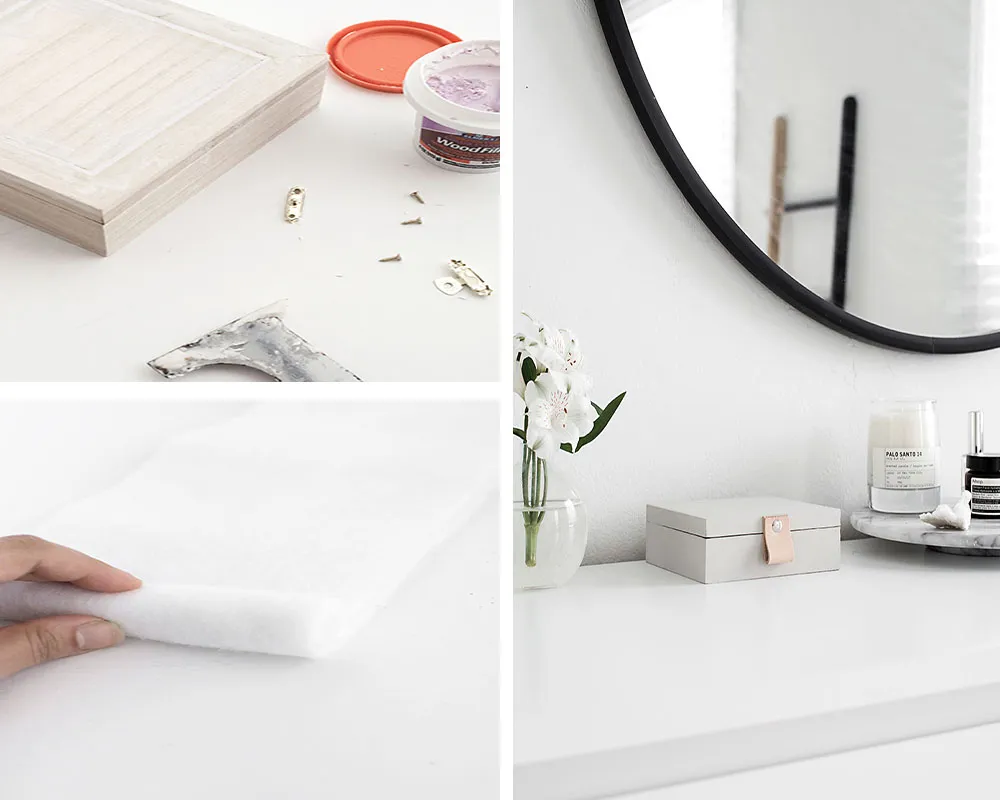
Materials needed are; wood box, screwdriver, wood filler, paint, foam brush, batting, velvet, glue gun, natural tooling leather, leather awl, thumbtack, and hammer. Remove any unwanted parts or engravings and fill up the hole with a wood.
Paint the box, then cut a strip of batting the same measurement as the inside of the box and roll it up. Cut up the velvet and use it to wrap around the batting – glue together. Repeat this process till there’s enough to fill inside of the box. Place the battings wrapped in velvet inside the box.
Utensil Holder Jewelry Hanger
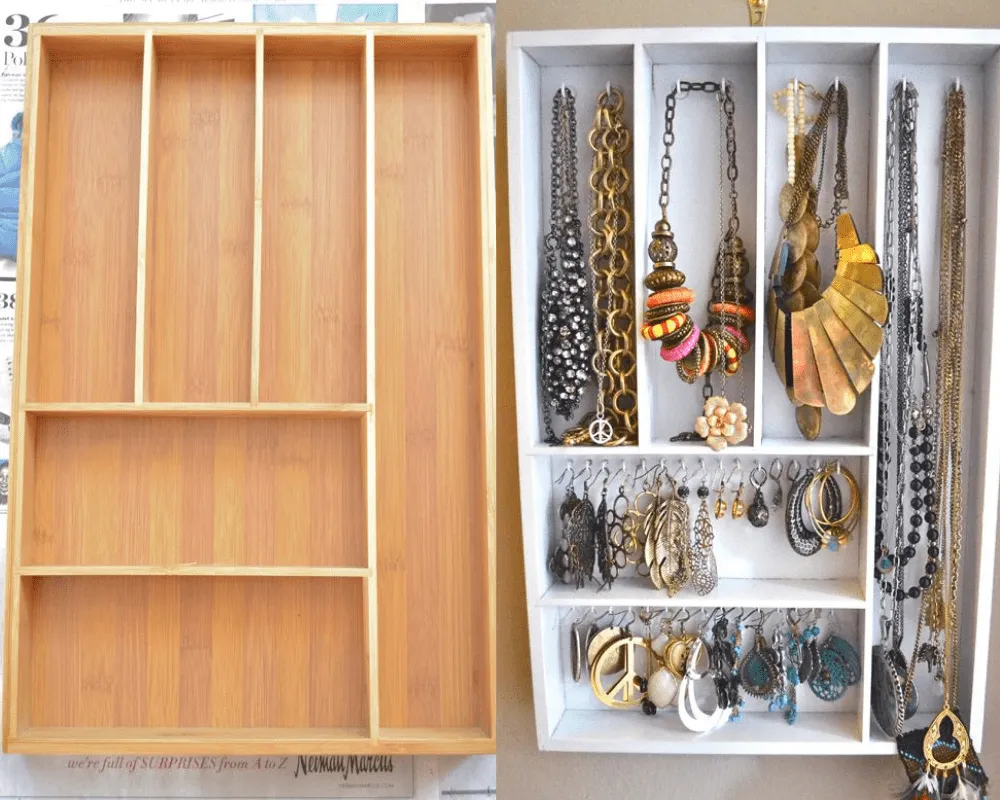
Create beautiful jewelry storage with just a wooden utensil hanger and a few hooks. A plastic utensil will also work just fine but a wooden one is more appealing to sight and can last longer.
Simply put the hooks on top of the columns – make sure they are well spaced out. The hooks will be used to hang necklaces and earrings. Hang on the wall and it’s ready for use!
Wood Board Sample Organizer
Here’s yet another super simple DIY jewelry organize. Take advantage of a wood board to create a chic organizer. Items needed are; a collection of wood board, a few screws, and an anchor or anything to hang it.
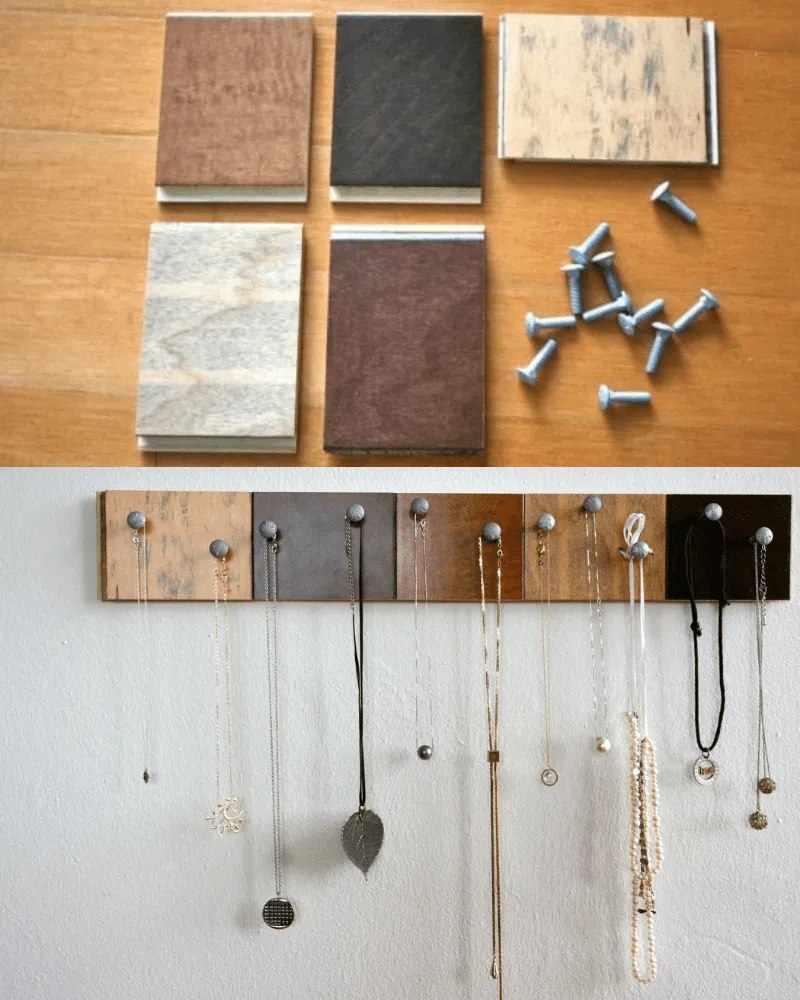
Use a hand drill or a nail and hammer to create a hole on the board. Make sure the holes are well spaced out. Push the screws onto the wood board through the holes and hang anywhere in the home.
Ready-Made Driftwood Jewelry Storage
The driftwood jewelry storage is nothing short of beautiful and unique. Apart from being a lovely wall art, the driftwood can hold a large quantity of jewelry. Usually, the driftwood is sold online.

It’s just a simple design made of a dull brown small tree branch and fitted with attachments drilled into it. This attachment extends a little forward for jewelry to stay comfortable. It’s an easy to use storage. It is an ideal decorative piece that fits well into the theme of a room with plenty of wooden accessories.
Fabric DIY Jewelry Storage
The fabric storage could still be expensive despite being and homemade design. This is because the fabric needs to sown before use. For someone who can sew, it’s not a problem, but for someone who can’t, then it may be quite expensive than expected.

After the fabric is prepared, thumb stacks are fixed in a rectangular pattern around the fabric. The nail heads are fixed across the surface of the fabric for jewelry to be attached. This anti-tarnish storage is suitable for all types of jewelry.
Ready-Made Organizer
Not all jewelry storage are handmade, some are too sophisticated to be handcrafted at home. This ready-made organizer is well designed and can be hung on the wall. It’s available for purchase in some online stores.

The organizer can hold a lot of jewelry, especially suitable for someone with a big collection. The organizer can hold enough weight and it’s long-lasting. The extra flat space on it can hold a flower vase or any other decorative item. It’s a simple wooden design.
Pegboard and Accessories Station
Simple yet gorgeous! This storage idea will transform a pegboard into a beautifully organized center. Get a thin board about 1 inch wide and attach it to the back of the pegboard.
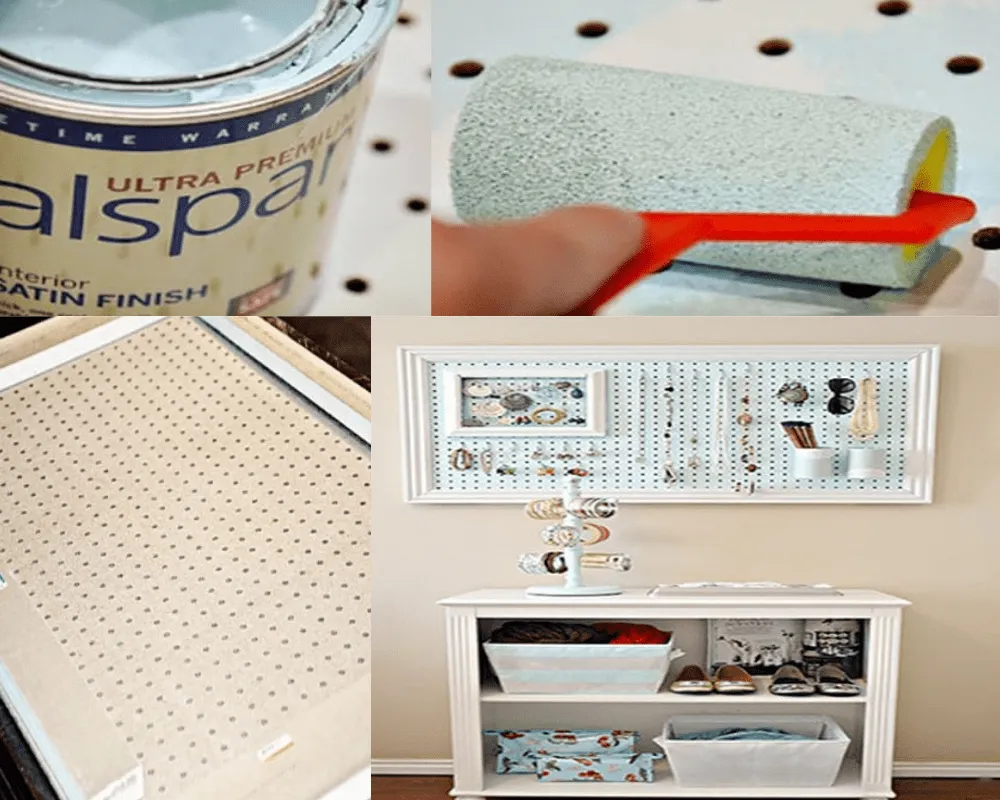
Paint in any color of choice, screw in a copper wire or a thick rope to both ends of the pegboard. Hang the pegboard on the wall and it’s ready! A brilliant storage idea; easy and inexpensive.
The Natural Twig Jewelry Storage
Sometimes, nature gives jewelry storage ideas. Who could have thought a twig can be so beautiful and useful? For someone who owns a garden, winter might be the ideal time to pick twigs for jewelry storage and decoration.

A big and well-branched twig is ideal storage. Since the twig can’t stand alone, a vase would suffice. Simply purchase a vase and spray paint. Spray paint can be used on the twig, it gives the twig color, and prevent decay. Next, the painted twig is then placed into a vase.
Thread Rack Jewelry Storage
The thread rack is available for purchase online. The rack is multipurpose and as such, it easily comes as a perfect idea when thinking of storage ideas. The thread is well designed to be hung on walls. It has lots of protruding wooden tips.

These tips can comfortably hold necklaces, bangles, rings, and big size earrings. The wooden design is lovely, and ideal anti-tarnish storage. Purchase one today enjoy the use of this well-carved woodwork.
Minimalistic Board in a Frame
Here’s another DIY storage to try. To make this, get a 0.5 plywood, hooks and screw eye hooks, a couple of screws, 0.25 inch wire mesh and wire cutters, stapler, glue, scrap molding, and paint.
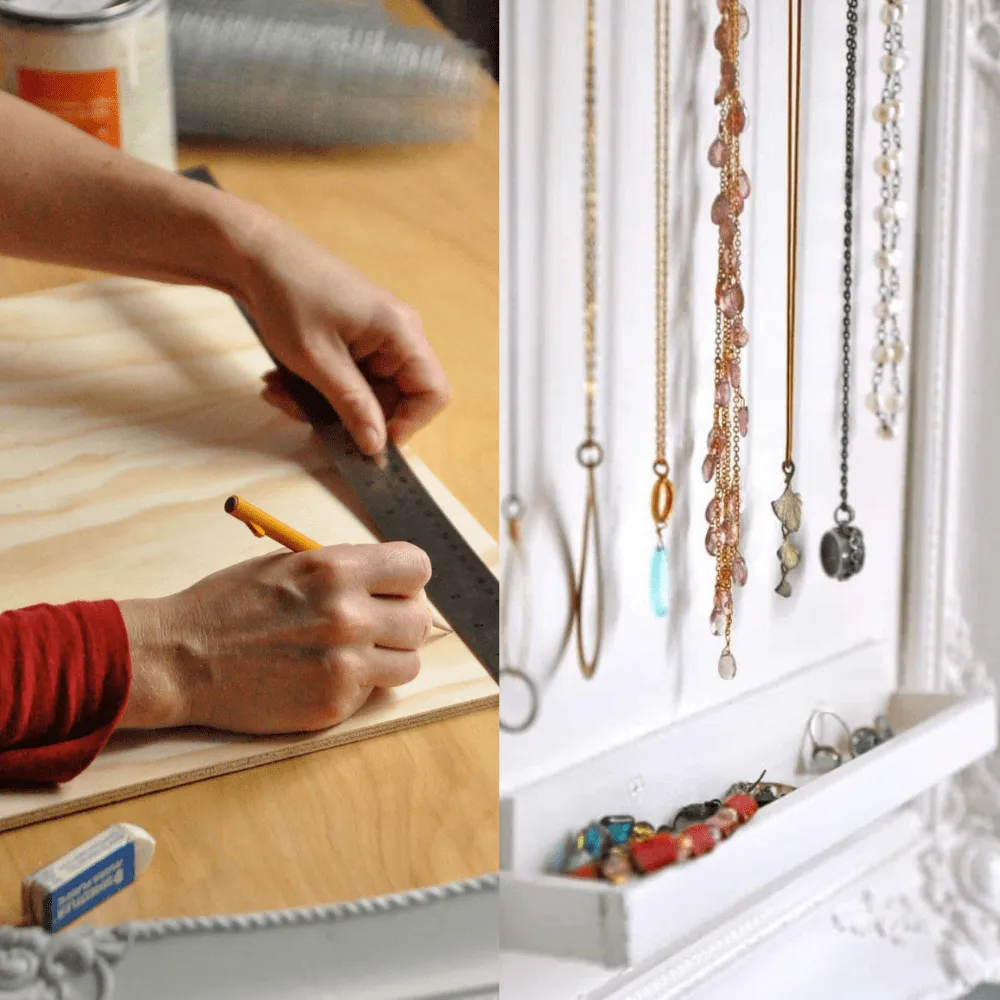
Screw in the hooks, spacing out the earring hooks and necklace hooks on the scarp molding. Make a small box out of the scrap molding, simply use the glue and clamps to put together the box. Glue the plywood backing to the frame, and then paint.
Wooden Board Organizer
Here’s a pretty practical DIY jewelry storage that can help keep things organized. Get a wooden cutlery tray, paint, knobs, and cup hooks. Smoothen the back of the wooden tray thoroughly with a sanding machine or paper, paint all cervices and sides – make sure to paint carefully and thoroughly.

Then, using glue, attach the knobs to the top of each compartment. Next, screw the cup hooks along the bottom of the tray and this jewelry storage tray is ready for use.
Kid’s Jewelry Organizer
The kids also sometimes need to keep their jewelry organized. No one wants his/her kids to get injured while running around in the home. Here’s a simple jewelry organizer to try to keep things tidy and protect the kids as well.

For this jewelry organizer, materials needed are; wooden pegs and a frame, and something to fill the center of the frame to add some weight to keep it steady.
Cute Lace Earring Holder
Here’s another organizer to help put those beautiful earrings on display while still keeping things organized. Get a picture frame, get enough lace that will fit inside the picture frame, glue, thumbtacks, and cardboard.

Cut the lace to fit the picture frame, pin down the lace tightly to the frame using the thumbtacks, then cut the cardboard into thin strips. Apply glue to the inner edges of the frame over the pinned lace, then use the strips of cardboard to press down the lace and glue firmly–it’s ready for use!
Wooden Base Jewelry Organizer
A wooden base jewelry organizer is one of the most stunning and simple design one can make at home. This DIY jewelry storage is suitable for wall decoration. The necessary tools are a hammer, glue, a small block of wood (2×2), brass dowels, and a hanger.
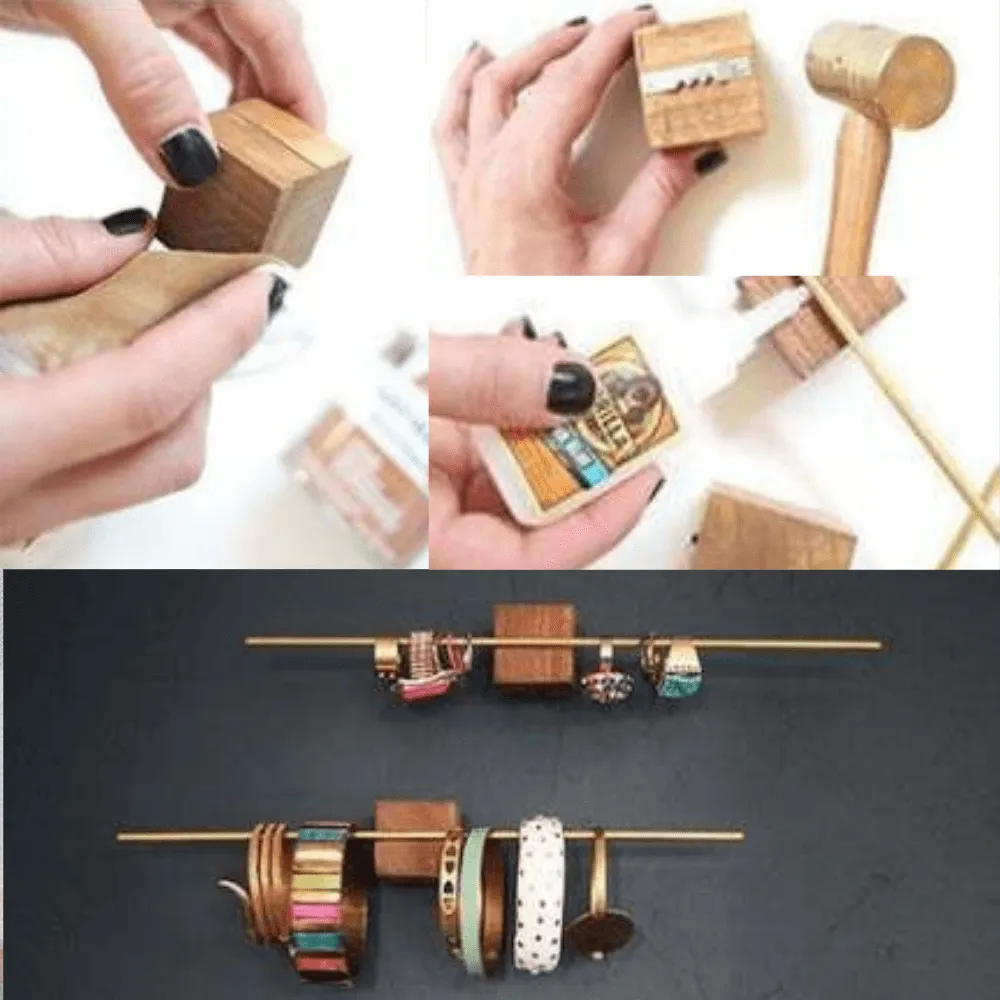
First, use the hammer to attach the hanger to the wood. Next on the opposite side of the wood, use glue that dries clear to attach the dowels to each wood. Lastly, attach each wood to the wall at a small distance from each other.
Embroidery Hoop Earring Display
Elegance can be created in just about five minutes. Yes! with an old embroidery hoop and a few strips of lace, a perfect place to hang and display those gorgeous earrings can be created.
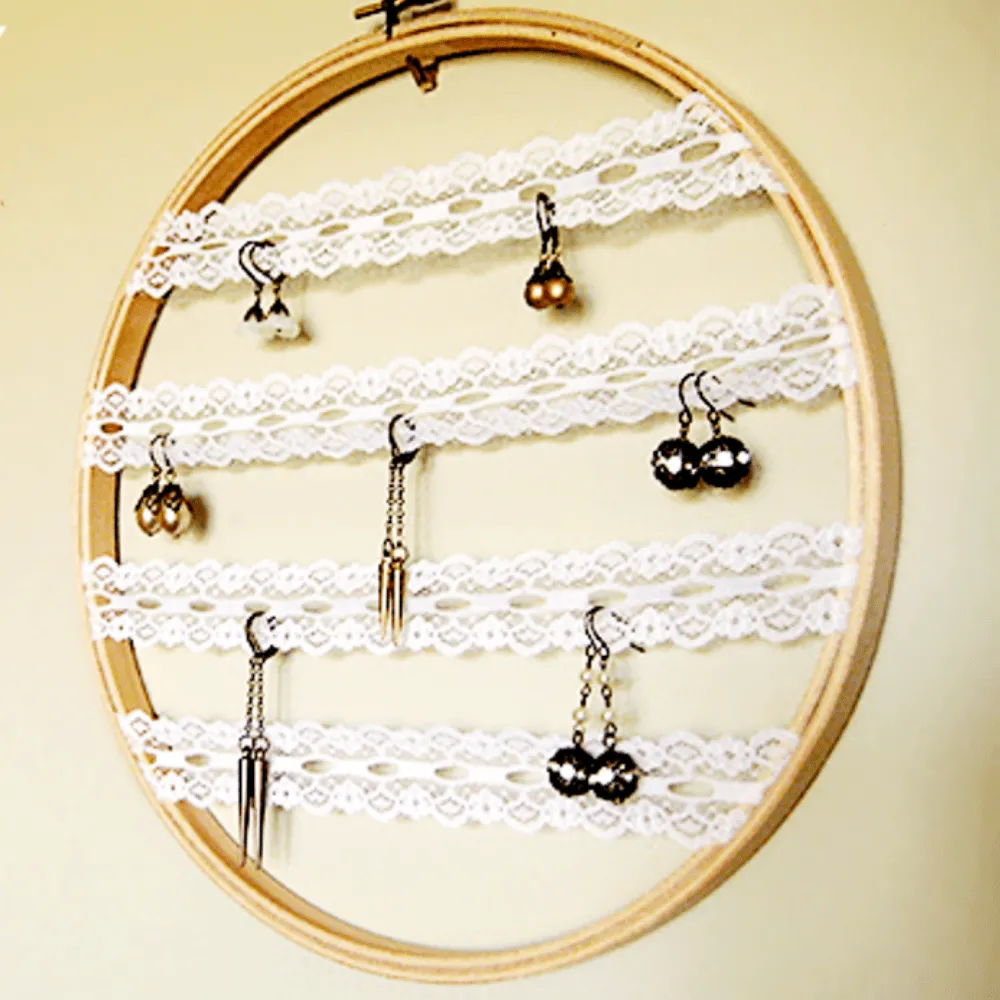
To make this DIY earring organizer, simply separate the hoop and place the lace ribbon in, and put it all back together. Hang on the wall and it’s ready for use! Display those earrings with elegance.
Twig-Painting Jewelry Holder
This DIY jewelry storage involves the use of a few small twigs, copper wiring, a carving knife, and a sanding machine or paper.

Carve the bark off the twigs and use the sanding machine or paper to smoothing the look of the twig, after which, attach them to one long straight branch with the copper wiring. There goes a simple DIY jewelry storage idea; it’s stylish and simple to make.
Elegant Shelf
Thinking about jewelry storage solutions? Here’s another. Get a few pieces of wood about 40 inches long and a box of upholstery nails. Nail the woods together to create two levels just like the one in the picture below.

A little sanding and paint will give the wood a facelift, making it room worthy. Next, nail the upholstery nails about an inch apart from each other. Ready for use! This makes it possible to arrange necklaces even in a small space.
The Vintage Bowl Method
DIY jewelry storage can be simple, yet beautiful and chic. The use of vintage bowls is an easy alternative to other intricate methods of jewelry storage. A local antique store could be a good place to pick up these types of bowls.

The quantity of the jewelry will determine the number of bowls to purchase. A general rule of thumb is to avoid placing too much jewelry in a particular antique bowl. It’s also not advisable to put the bowls on a tabletop due to exposure and possible congestion of space—use a drawer or shelf instead.
The Rustic Jewelry Storage
The Rustic jewelry storage is cannot be handcrafted except by a professional. It requires crafting in an artistic style that requires lots of details. The white color makes it an ideal wall decorative material.

For someone with a room with plain walls, the jewelry organizer is perfect. It looks beautiful on its own but coupled with the glitters hung on it, the outlook is nothing short of magical and magnificent. Most times, a visit to a decoration store allows one to purchase it. Alternatively, an online store could also be an option.
Wooden Box Jewelry Storage
This DIY jewelry storage would take just about 10 minutes to complete. The materials needed for this project are; a wooden box, knob, drill, acrylic paint, and brush. Use a hand drill or hammer and nail to create a hole in the center of the lid of the box.
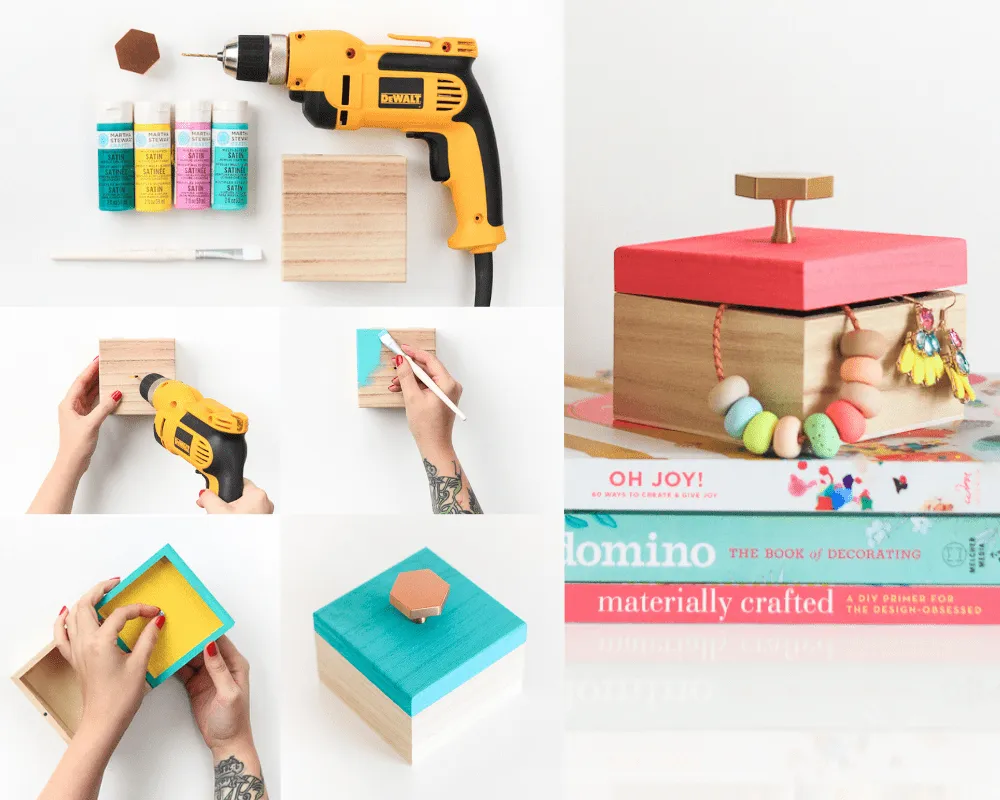
Just make sure not to drill holes bigger than the screws available. Paint the box whichever color and however pattern is preferable. Then, screw the knob into place, and this is ready for use.


