Contouring makeup has become a go-to technique for many beauty enthusiasts looking to enhance their facial features and achieve a flawless, sculpted look. In this article, we will explore how to get perfect contouring makeup ideas tailored specifically to your skin tone. By understanding the nuances of your skin tone and selecting the right contouring products and techniques, you can achieve a beautifully contoured face that enhances your natural beauty and leaves you feeling confident and radiant.

What is Face Contouring?
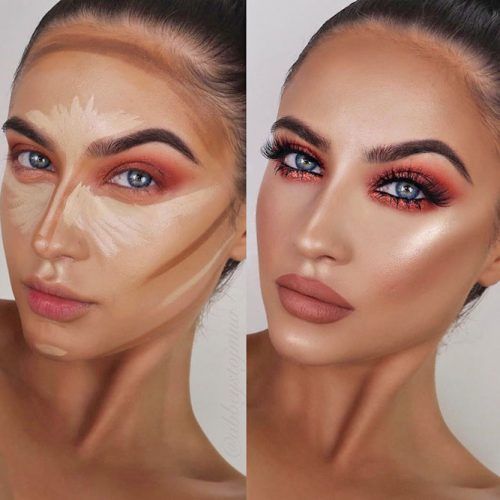
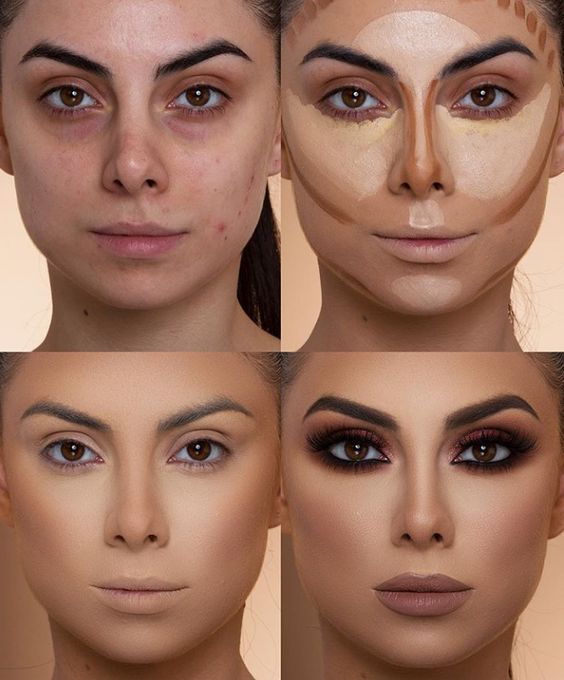
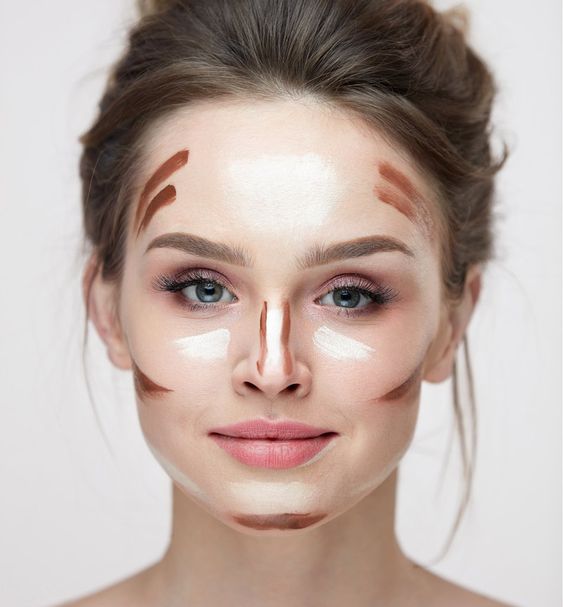
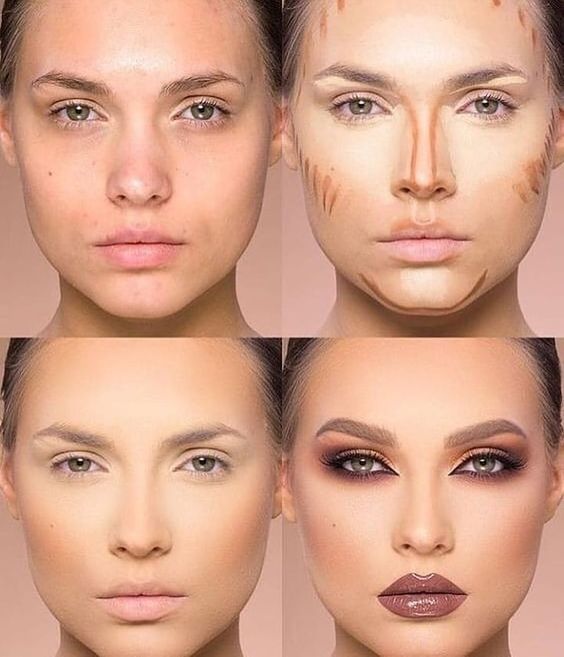
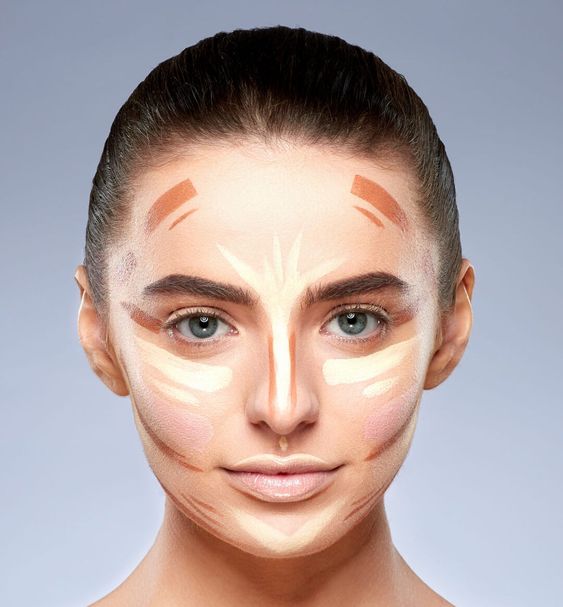
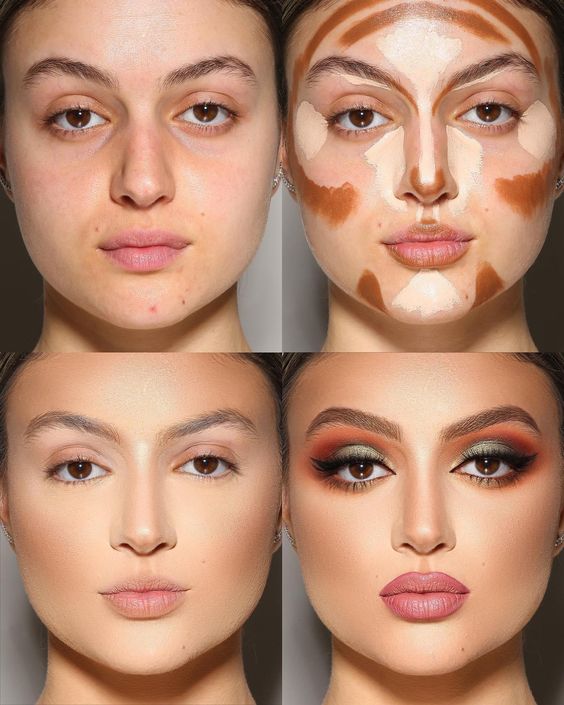
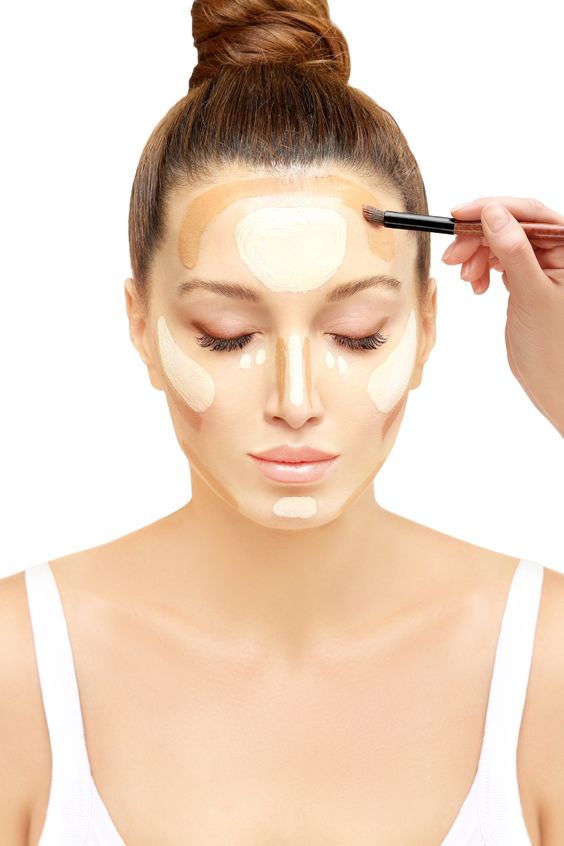
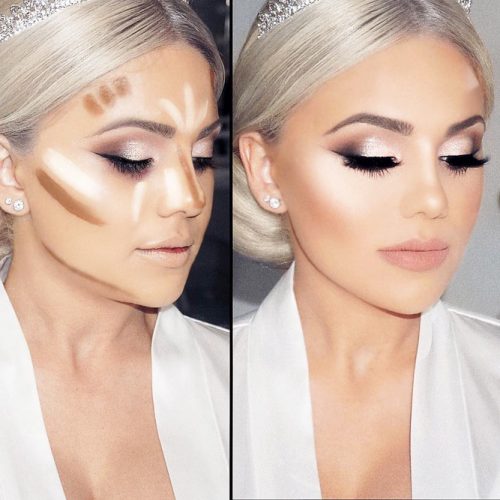
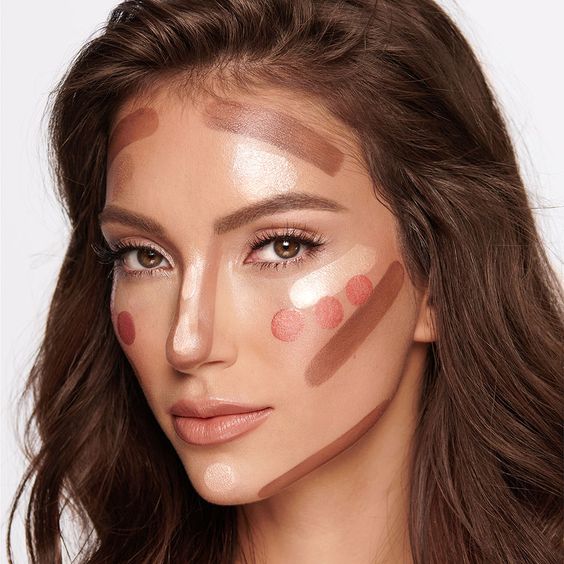
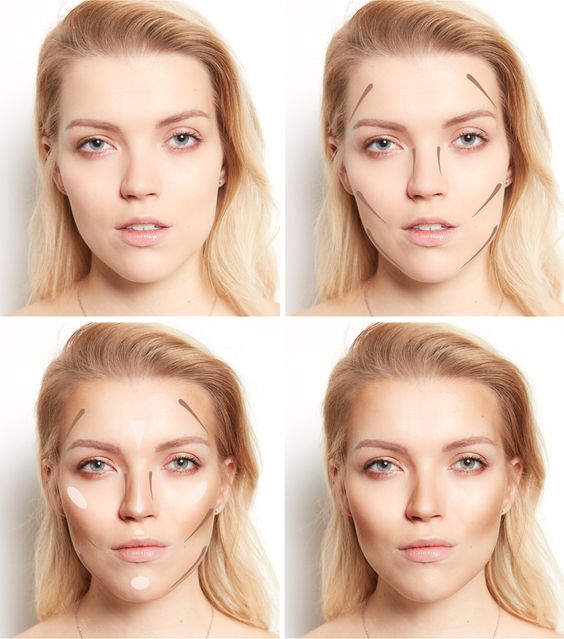
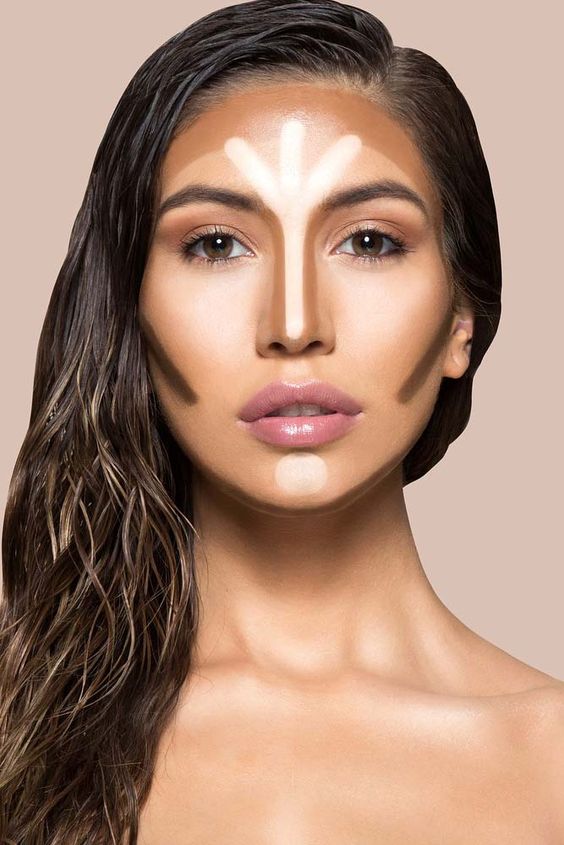
Face contouring is a makeup technique that involves using different shades of makeup to create the illusion of shadows and highlights on the face. The goal is to enhance and sculpt the facial features, creating a more defined and symmetrical appearance. Contouring is typically done by applying a darker shade of makeup to areas that you want to appear more recessed, such as the hollows of the cheeks, the temples, and the jawline. This creates the illusion of depth and helps to slim and shape the face.
On the other hand, a lighter shade of makeup is applied to areas you want to bring forward, such as the high points of the cheekbones, the bridge of the nose, and the brow bone. This adds dimension and luminosity to the face. The overall result is a more structured, chiseled, and balanced facial appearance. Contouring can be achieved using various makeup products, including creams, powders, or liquid formulations, and is often blended seamlessly to create a natural-looking effect.
Face Contouring Tools

Here are some popular contouring products that are commonly used for achieving flawless contouring:
1: Contouring Brush
A contouring brush is an essential tool for achieving flawless and sculpted makeup looks. This specialized brush is designed to help apply and blend contouring products seamlessly onto the face, creating shadows and highlights to enhance and define the facial features.
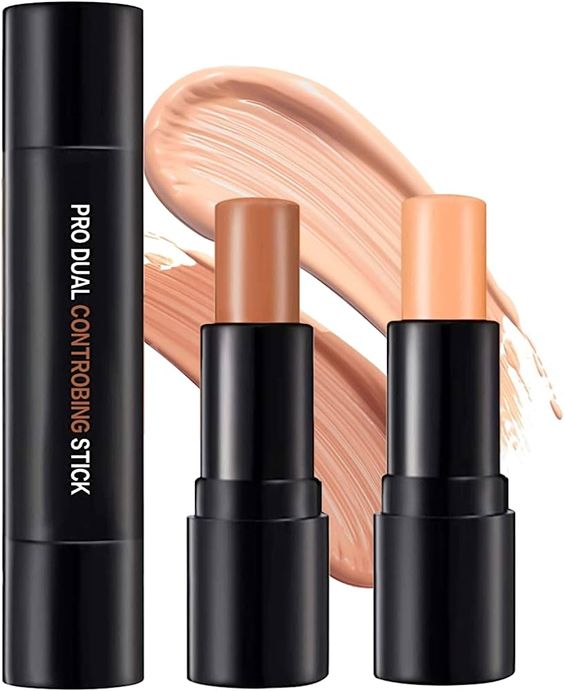
2: Contour sticks
Contour sticks are versatile and convenient makeup products designed specifically for contouring the face. They usually come in a stick or crayon-like form, making them portable and easy to use. Contour sticks are typically creamy in texture, allowing for smooth and seamless application onto the skin.
3: Highlighter Brush
A highlighter brush is an essential tool for achieving a radiant and luminous glow on the skin. This specialized brush is designed to apply and blend highlighter products seamlessly, creating a soft and natural-looking luminosity.
How to Contour an Oblong Face
To contour an oblong face shape, focus on adding width to the forehead and jawline while minimizing the length of the face. Start by applying a matte contour shade to the temples and along the hairline to reduce the appearance of a long forehead. Then, blend the contour shade along the jawline and under the chin to create the illusion of a narrower and more defined jaw.
Next, apply a lighter shade or a highlighter to the center of the forehead, down the bridge of the nose, and on the highest points of the cheekbones to bring attention to the center of the face and add dimension. Blend the highlighter well to create a natural-looking glow. Remember to blend carefully and use soft, gradual strokes to create a seamless transition between the contour and highlight shades. By strategically placing and blending these products, you can enhance your oblong face shape and achieve a more balanced and harmonious appearance.
How to Contour a Square Face
To contour a square face shape, focus on minimizing the sharp angles and creating more rounded and softer features. Start by applying a matte contour shade to the temples, blending it towards the hairline. This helps to soften the width of the forehead. Then, apply the contour shade along the jawline, starting from the ears and blending it downwards towards the chin. This helps to create a more tapered and less boxy appearance.
Next, apply a lighter shade or highlighter to the center of the forehead, down the bridge of the nose, and on the highest points of the cheekbones. This brings attention to the center of the face and adds dimension. Blend the highlighter well to create a natural glow. Lastly, you can also apply a bit of contour shade to the sides of the jawline to further soften the angles. Remember to blend everything well to ensure a seamless transition between the contour and highlight shades.
Round Face Contouring
Contouring a round face shape involves creating the illusion of more defined cheekbones, a slimmer face, and a more angular jawline. To contour a round face shape, focus on adding definition and creating angles. Start by applying a matte contour shade in the hollows of the cheeks, starting from the temples and blending towards the center of the cheeks. Next, apply the contour shade along the hairline, starting from the temples and blending towards the center of the forehead. This helps to reduce the width of the forehead and create a more balanced look.
Finally, apply a lighter shade or highlighter to the center of the forehead, down the bridge of the nose, and on the highest points of the cheekbones. This brings attention to the center of the face and adds a subtle glow. Blend everything well to ensure a natural and seamless finish. By strategically contouring and highlighting, you can create the appearance of a more sculpted and defined look for a round face shape.
How to Contour a Triangular Face
To contour a triangular face shape, follow these simple steps. First, use a matte contour shade to minimize the width of the forehead by applying it along the temples and blending towards the hairline. Next, contour the jawline by applying the shade from the ears and blending towards the chin, softening any sharp angles. Then, define the cheekbones by applying the contour shade to the hollows of the cheeks and blending towards the center.
Make sure to blend well for a natural look. Finally, use a lighter shade or highlighter on the center of the forehead, down the bridge of the nose, and on the highest points of the cheekbones to add a subtle glow and draw attention to the center of the face. Remember to blend the highlighter for a seamless finish. These simple contouring techniques will help balance and enhance your triangular face shape.
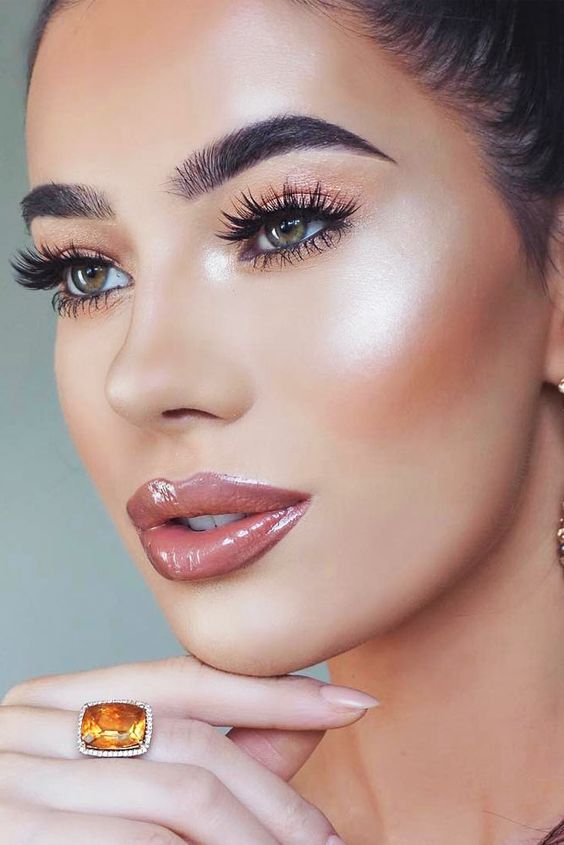
How to Contour for Light Skin Tones
Contouring for light skin tones is all about enhancing your natural features with a subtle touch. Choose a contour shade that is just a shade or two darker than your skin tone and has a matte finish. Apply it to the hollows of your cheeks, blending upwards towards the temples for a soft shadow effect. Keep the contouring light and natural by lightly defining the jawline, blending towards the chin.
For a luminous touch, opt for a highlighter with a soft shimmer in shades like champagne or rose. Apply it to the high points of your face, such as the cheekbones, bridge of the nose, and cupid’s bow. Blend everything well for a seamless look that enhances your light skin tone with a subtle and natural glow.
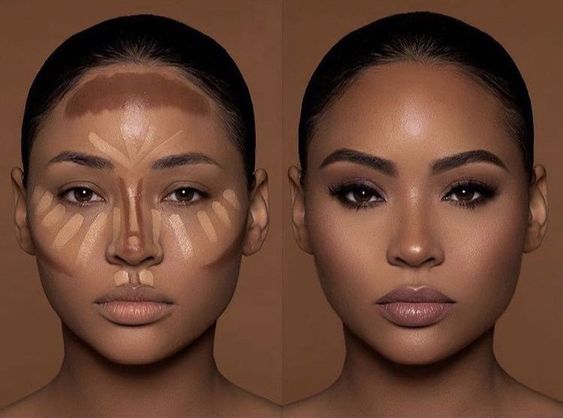
How to Contour for Medium and Dark Skin Tones
Contouring for medium and dark skin tones is all about enhancing your natural features and adding dimension to your face. Choose a contour shade that is a few shades darker than your skin tone and has warm undertones. Apply it to the hollows of your cheeks, temples, and along the jawline to create depth and definition. Blend the contour shade well to achieve a seamless finish.
For a radiant touch, select a highlighter with golden or bronze undertones that complements your skin tone. Apply it to the high points of your face, such as the cheekbones, bridge of the nose, and cupid’s bow, to add a beautiful glow. Blend everything together for a sculpted and natural look that enhances your medium or dark skin tone.